Category: Blog

Your blog category

  • Anti-Inflammatory Bedtime Drink: What I Make When I Feel Bloated

    Anti-Inflammatory Bedtime Drink: What I Make When I Feel Bloated

    There’s a specific kind of uncomfortable that happens at night — and if you’ve ever gone looking for an anti-inflammatory bedtime drink that actually works, you’ve probably ended up with a list of supplements or a golden milk recipe that tastes like paste. This is neither of those things.

    I started making this infusion maybe a year ago, almost by accident — I was pulling random things from my kitchen because I’d read about each ingredient separately and thought, why not try them together. I didn’t expect much. But the first time I drank it, I felt noticeably less inflamed within about forty minutes. Not completely fixed, not magically healed — just… lighter. Calmer. Like my body had been given something it needed.

    I’ve made it dozens of times since. It’s become a real nighttime ritual.


    This post contains affiliate links. If you purchase through my links, I may earn a small commission at no extra cost to you — thank you for supporting By Sofi Maruri.


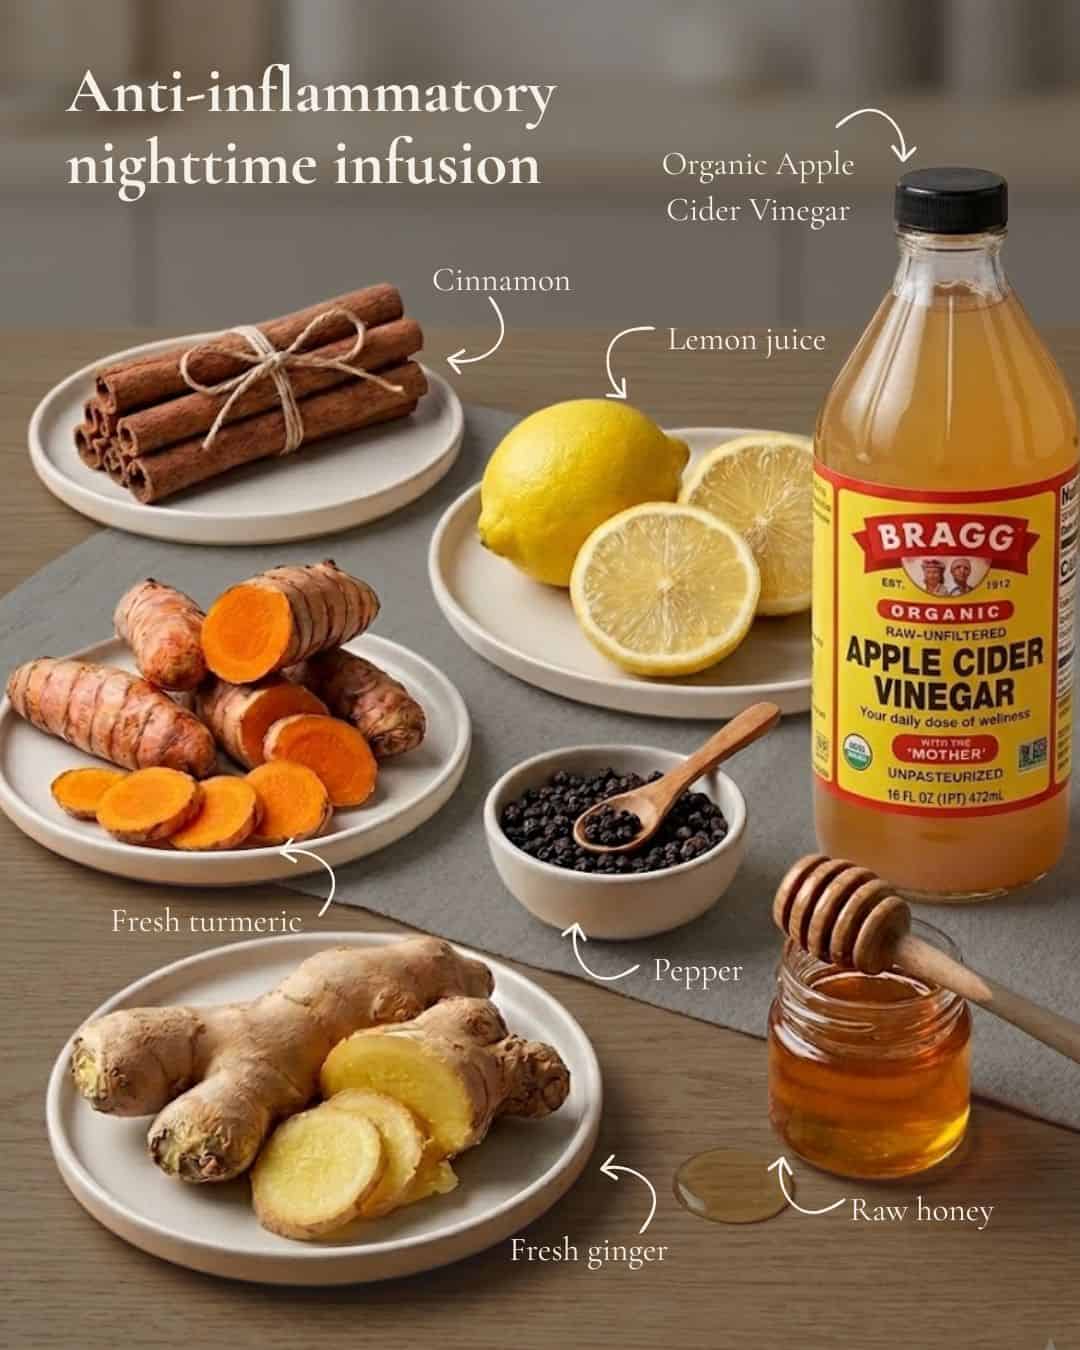
    What’s in it (and why each ingredient is there)

    This isn’t a recipe I found somewhere. It’s one I built from what I actually had and what I actually felt worked. Here’s the breakdown:
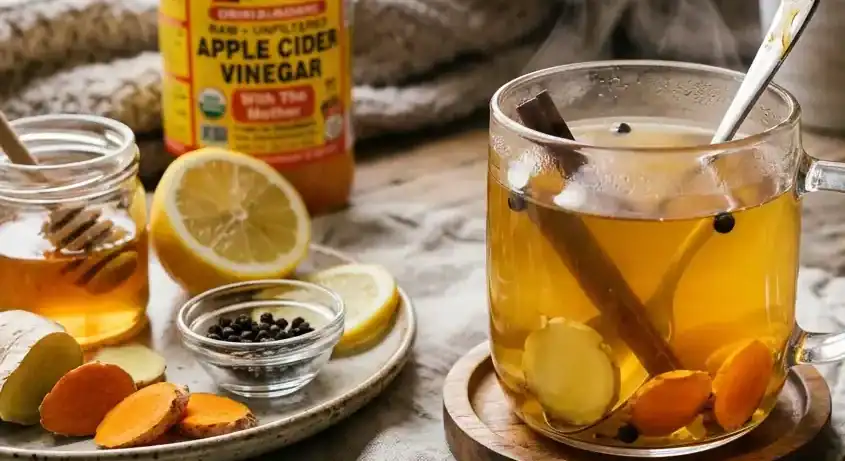
    Cinnamon stick

    I use one whole cinnamon stick, not powder. The whole stick releases more slowly into hot water and has a cleaner, less dusty flavor. Cinnamon has been widely studied for its potential anti-inflammatory and blood sugar-regulating properties — some research suggests cinnamon may help the body process glucose more efficiently, which can be relevant when evening bloating is connected to what you ate for dinner.

    Black peppercorns (just 2)

    Two peppercorns sounds almost comical, but there’s a real reason they’re here. Black pepper contains piperine, a compound that significantly increases the bioavailability of curcumin — the active compound in turmeric. In other words: without the pepper, you absorb a fraction of what turmeric could do for you. The peppercorns don’t make the drink spicy at this quantity. They just do their quiet job.

    Fresh ginger

    Three thin slices of real ginger root, not powder. Fresh ginger has a completely different character — it’s bright and slightly sharp where powdered ginger is flat. Ginger is one of the most well-researched natural remedies for digestive discomfort. It’s been shown in multiple studies to help with nausea, support gastric emptying, and reduce gut inflammation. I notice a real difference between nights when I use fresh ginger and nights when I skip it.

    Fresh turmeric

    Three slices of fresh turmeric. Again — fresh changes everything. The flavor is earthier and more intense than powdered turmeric. Curcumin, the primary active compound in turmeric, is one of the most studied natural anti-inflammatory substances. It’s not a cure for anything, but supporting your body’s natural inflammatory response consistently over time does seem to matter. (This is why the pepper is important — it’s not decorative.)

    Lemon

    The juice of a whole lemon. I don’t measure, I just squeeze. Lemon adds brightness that cuts through the earthiness of the ginger and turmeric, and vitamin C supports general immune function. But honestly, lemon is also just what makes this drinkable. Without it the infusion is heavy and muddy. With it, it feels alive.

    Raw honey

    One tablespoon. I add it after the water has cooled slightly — if the water is too hot it destroys the enzymes that make raw honey different from regular honey. Honey soothes the throat, adds gentle sweetness, and has its own antimicrobial properties. It also just makes the whole thing feel like a treat instead of a medicine.

    Apple cider vinegar

    One teaspoon of raw, unfiltered apple cider vinegar — the kind with “the mother” still in it. This is the ingredient that surprised me most. ACV is genuinely polarizing, but I’ve found that a small amount helps with that post-dinner heaviness, possibly because it supports stomach acid levels and helps the body break down proteins more effectively. The key word is small — a teaspoon in a full mug of water. Not a shot glass of straight vinegar.

    I personally use this organic apple cider vinegar — it’s raw, unfiltered, and has the mother.

    anti-inflammatory bedtime drink with ginger turmeric and cinnamon

    Recipe

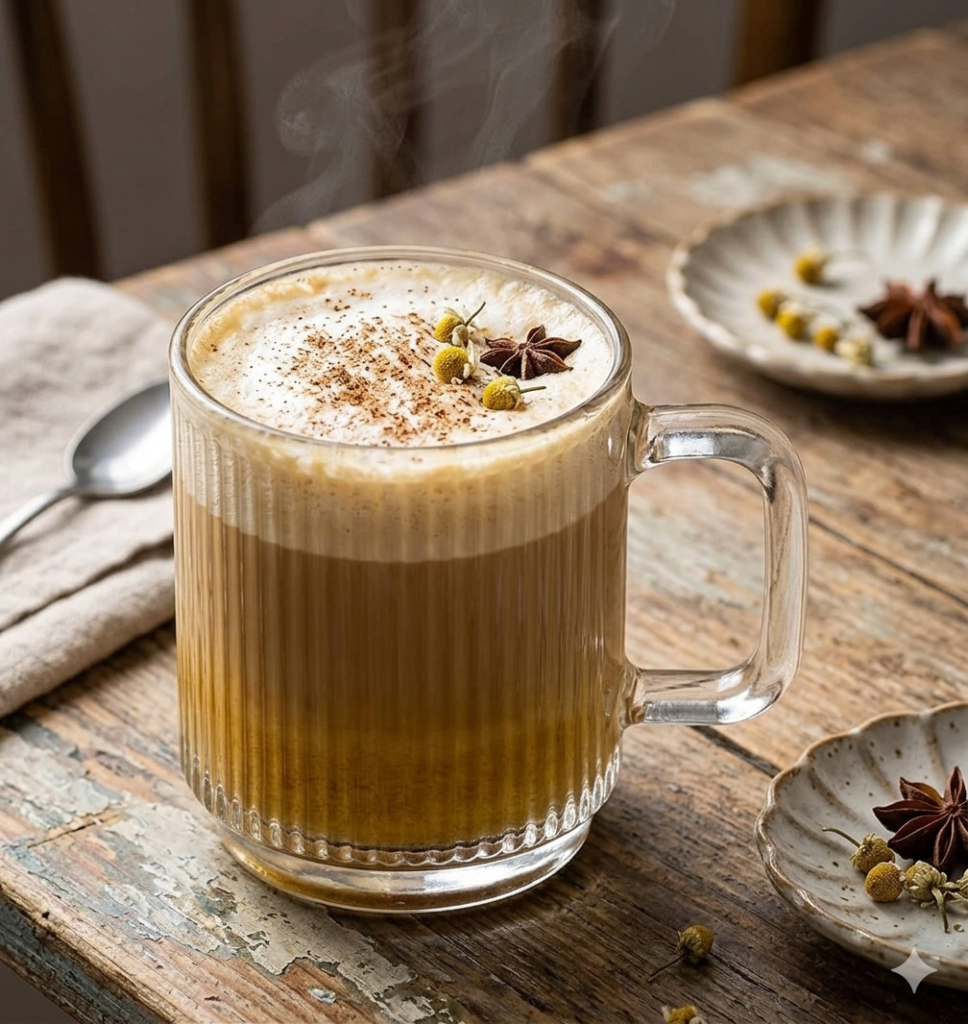
    The anti-inflammatory bedtime drink recipe

    A warming drink made with whole spices and natural ingredients — the kind of thing you make when your body is asking for a reset.

    ⏱ 10 minutes ☕ 1 cup

    Ingredients

    • 1whole cinnamon stick
    • 2black peppercorns
    • 3 slicesfresh ginger root (~3mm thick)
    • 3 slicesfresh turmeric root (~3mm thick)
    • 1lemon, juiced
    • 1 tbspraw honey
    • 1 tspapple cider vinegar (with the mother)
    • 300 mlhot water, not boiling

    Instructions

    1. 1

      Add the cinnamon stick, peppercorns, ginger, and turmeric to your mug.

    2. 2

      Pour the hot water over the spices. Let steep for 4–5 minutes. Hot but not boiling — aggressive heat can degrade some compounds in turmeric and ginger.

    3. 3

      Squeeze in the lemon juice, then stir in the honey and apple cider vinegar. Taste and adjust — if it’s too sharp, add a little more honey.

    4. 4

      Drink while warm, ideally 30–60 minutes before bed.

    A few notes: Fresh turmeric and ginger taste completely different from powdered — earthier, more alive. If you can only find powdered, use ¼ tsp each. Add the honey after the water cools slightly so you don’t destroy the enzymes. Use raw, unfiltered ACV with “the mother” — that cloudy sediment at the bottom is where the good stuff lives.

    A few honest notes

    This is not medicine. I’m not a doctor, a nutritionist, or a herbalist. I’m a person who makes a drink that makes her feel better. If you have a chronic condition, are pregnant, or are on any medication, please check with your doctor before adding new things to your routine — especially ACV, which can interact with some medications.

    It won’t fix everything. If you’re regularly bloated, it’s worth paying attention to what you ate that day, how fast you ate, your stress levels, your sleep. This drink is one small tool, not a solution.

    Consistency seems to matter more than perfection. I notice the most difference when I make this three or four nights in a row, not just once when I’m desperate.


    When I reach for it

    • After a dinner that was heavier than usual
    • When I’ve had more processed food or sugar than normal
    • Before a day where I know I need to feel light and clear
    • Any night where I just want a warm ritual that isn’t chamomile tea again

    The ritual part matters

    This anti-inflammatory bedtime drink has become part of mine.

    I want to say something about this that isn’t just about ingredients. There’s something about making a hot drink intentionally — pulling out the cutting board, slicing the ginger and turmeric, watching the water turn gold — that itself signals to my nervous system that the day is ending. That it’s time to slow down.

    Some of the benefit might be the compounds. Some of it is absolutely the act of making something gentle for yourself at the end of a hard day.

    Both things can be true.


    Have you tried anything similar? I’d love to know in the comments — especially if you have your own version of a nighttime infusion.

  • Sony ZV-1 Review: I Took It Across Europe and Here’s the Honest Truth

    Sony ZV-1 Review: I Took It Across Europe and Here’s the Honest Truth

    Why I Chose the Sony ZV-1 for Travel

    I wanted one camera that could do a little of everything without weighing down my bag or screaming “tourist with expensive gear.” The ZV-1 fit that brief almost suspiciously well. It’s tiny, it’s light, and it doesn’t look intimidating — which, when you’re traveling alone, matters more than people admit.

    The fact that I found one used for $500 sealed it. If you’re patient with secondhand listings, this camera is far more accessible than its reputation suggests.

    The Sony ZV-1 Vlogs Look Incredible

    This is where the Sony ZV-1 review really gets interesting, because the ZV-1 genuinely surprised me here. The footage looks expensive. Colors are rich, the autofocus locks onto your face and refuses to let go, and the background blur gives everything that soft, cinematic feel without any extra work.

    The built-in microphone is also better than it has any right to be. I expected to need an external mic for decent audio, but for walking-and-talking travel clips, the onboard sound held up beautifully — even with wind and street noise around me.

    Sony ZV-1 review for travel

    The Sony ZV-1 Fits in Your Purse (and Sails Through Airports)

    I cannot overstate how freeing it is to have a camera that fits in your handbag. No dedicated camera bag, no bulky case, no production. It slipped into my purse and came everywhere.

    Airports were a non-issue too — no special handling, no awkward conversations at security. It travels like the small, unfussy companion it is.

    Excellent Photos in the Sony ZV-1’s Smart Mode

    The video gets all the attention, but the photos deserve their own moment. Using its intelligent auto mode, the ZV1 consistently pulled excellent shots — even in tricky light, even when I was rushing. I’ll let some of my actual trip photos do the talking below.

    The Sony ZV-1’s Honest Downside: Battery Life

    If I’m being radically honest — and I always am with you — the battery is the one thing I’d change. On a full day of shooting, it doesn’t quite go the distance.

    The fix is simple, though: carry spare batteries. They’re inexpensive, they weigh almost nothing, and swapping one in takes seconds. Once I started traveling with a couple of extras, the problem basically disappeared. Just know going in that one battery won’t carry you through a packed sightseeing day.

    Accessories That Made My Sony ZV-1 Better

    A few small additions turned the ZV-1 from a great camera into my camera:

    None of these are expensive, but together they make the camera feel more capable and a lot more yours.

    • A handmade wrist strap. I made my own to keep the camera secure while I walked around — peace of mind that I wasn’t going to drop it on cobblestones.
    • A silicone case. Light protection that keeps it safe in my bag without adding bulk.
    • An external flash. I added one for low-light situations and it works perfectly — a worthwhile upgrade if you shoot indoors or at night.
    • Spare batteries. The ZV-1’s biggest weakness is battery life, so I never travel without a couple of extras. They’re tiny, cheap, and swapping one in takes seconds — it’s the single accessory that turned the battery problem into a non-issue on long sightseeing days.
    • A high-capacity memory card. When you’re shooting beautiful video all day, storage fills up fast. A fast, roomy card means I’m never deleting clips at a café to make room or worrying about running out mid-trip — I just shoot and forget about it.
    • A card-to-phone adapter. This one’s a game-changer for travel. Instead of waiting until I’m back at a laptop, I pop the memory card into a small adapter and pull photos straight onto my phone — so I can edit and post from the road while the trip’s still fresh.

    So, Is the Sony ZV-1 Worth It?

    For travel, yes — wholeheartedly. It’s light, it’s discreet, it shoots beautiful video and photos, and it fits into a real life (and a real purse). The battery is its one genuine weakness, and it’s one you can solve for the price of a coffee.

    If there’s one takeaway from this Sony ZV-1 review, it’s this: if you want one camera that does almost everything without the weight or the intimidation factor, the ZV-1 earned every bit of its place in my bag.

  • Common Manifestation Mistakes I Made (and What I Learned From Them)

    I manifested the job I wanted but forgot one detail — and it changed everything. Here are the most common manifestation mistakes and how to avoid them.


    The Time I Manifested a Job and Forgot About My Boss

    A couple of years ago, before I quit my corporate job, I went through a phase where I was deeply into manifestation. I had a little journal where I would write down what I wanted with as much detail as I could — the kind of work I wanted to do, the type of people I wanted around me, even the equipment I wanted to use every day.

    I remember writing very specifically that I wanted a job with good coworkers, a creative environment, and — this is the oddly specific part — that the company would give me a MacBook to work on, because I felt I could be so much more creative on one.

    Months passed. I got the job. I walked into the office on my first day, and there it was, sitting on my desk: a MacBook. Not a new one — a used one, slightly worn around the edges — but a MacBook nonetheless. And honestly, that detail makes me laugh now, because I had asked for the MacBook, but I hadn’t asked for a new MacBook. The universe took me very, very literally. My coworkers turned out to be some of the most genuinely good people I’ve ever worked with. The environment was creative. Everything I had written down had come true — word for word, no more, no less.

    And then I opened my old manifestation journal one night, reread my list, and noticed something that made me stop in my tracks.

    I had written about the job. The coworkers. The MacBook (just “a MacBook,” apparently). The kind of work I wanted to do.

    But I had never written a single word about the kind of leader I wanted to work for.

    And my boss? Let’s just say it wasn’t a match. It wasn’t anyone’s fault — I had simply left that detail blank, the same way I had left the word “new” out of my MacBook request. The universe, generous as always, filled in the gaps with whatever was available. And what was available wasn’t always aligned with me.

    That experience taught me something I’ve carried with me ever since: the universe always listens, and it isn’t working on a tight budget. It gives generously. But it gives exactly what you ask for — no more, no less. Every word matters. Every detail you leave out becomes a gap the universe gets to fill in for you.

    So if you’re getting back into manifestation, or starting for the first time, I want to save you from the same lesson I had to learn the hard way. Here are the most common manifestation mistakes I see (and have made), and how to avoid them.

    Mistake #1: Leaving Out the Details That Actually Matter

    This is the mistake that started this whole post. We tend to focus on the thing we want — the job, the relationship, the house, the income — and forget about the experience of having it.

    A job is not just a title and a salary. It’s a boss, a team, a commute, a schedule, an energy. A relationship is not just a partner. It’s how that person treats you, how they show up when things are hard, how they make you feel on a regular Tuesday.

    How to avoid it: When you write down what you want, ask yourself, “What does my daily life look like once I have this?” Then write down every detail of that daily life. The people. The mornings. The way you feel walking into the room. The small things.

    The universe doesn’t fill in the blanks the way you would. So don’t leave any. Not even the word “new.”

    Mistake #2: Manifesting From a Place of Lack Instead of Alignment

    There’s a big difference between “I want more money because I’m broke and scared” and “I want more money because I’m building a life that feels expansive.”

    Both are valid feelings. But the energy underneath them is completely different, and that energy is what you’re actually sending out.

    When you manifest from desperation, you’re reinforcing the feeling of not having. When you manifest from alignment, you’re already living as if it’s on the way.

    How to avoid it: Before you write or visualize, take a moment to regulate. Breathe. Do something that brings you back to yourself. You don’t need to fake high vibes — you just need to come from a place that isn’t panic.

    Mistake #3: Believing You Have to “Earn” What You’re Asking For

    This one is sneaky because it sounds responsible. “I’ll deserve it once I work harder. Once I’m more disciplined. Once I lose the weight. Once I fix myself.”

    But manifestation doesn’t run on a points system. You don’t unlock the things you want by suffering enough first.

    How to avoid it: Notice the conditions you’re attaching to your worth. Write them down. Then ask yourself if you’d attach those same conditions to someone you love. You wouldn’t. So why are you doing it to yourself?

    Mistake #4: Setting a Deadline and Then Spiraling When It Doesn’t Happen

    I get it. We want things now. We open the journal, write the thing, and then we expect the universe to deliver by Friday.

    But timing is one of the things we don’t get to fully control. And when we obsess over when, we end up creating resistance — the very thing that blocks what we’re trying to receive.

    How to avoid it: Replace deadlines with trust. Instead of “I want this by December,” try “I want this, and I trust it’s coming at the right time.” It sounds small, but the shift in your nervous system is real.

    Mistake #5: Contradicting Your Manifestation With Your Daily Thoughts

    You can write a beautiful intention in your journal in the morning and then spend the rest of the day thinking “this will never happen for me.”

    Your subconscious doesn’t separate the journal time from the rest of the day. Whatever you’re thinking most of the time is what you’re actually manifesting.

    How to avoid it: Pay attention to the loops your mind runs on default. The thoughts you have while showering, driving, falling asleep. Those are the ones doing the real work. If they contradict what you’re asking for, that’s where the work is.

    Mistake #6: Skipping the Inspired Action

    Manifestation is not just writing in a journal and waiting. The universe responds, but it usually responds with opportunities — a message, a conversation, a job posting, a random idea that pops into your head at 11 p.m.

    If you ignore those nudges, you’re closing the door on the very thing you asked for.

    How to avoid it: Treat your intuition like a serious source of information. When something feels like a sign, follow it. Send the message. Apply for the thing. Have the conversation. You don’t have to know the whole path — you just have to take the next step.

    Mistake #7: Only Manifesting Outcomes, Never Manifesting Who You Want to Become

    Most people manifest things. Few people manifest who they’re becoming.

    But here’s the truth: the version of you that has what you want is not the same version of you reading this right now. Manifestation works better when you focus less on the outcome and more on becoming the person who naturally attracts that outcome.

    How to avoid it: Alongside what you want to have, write down who you want to be. Calmer. More confident. More creative. More disciplined. More open. The “having” follows the “being,” not the other way around.

    Mistake #8: Thinking the Universe Has a Limited Supply

    This was the biggest shift for me after the job/boss situation. I used to think I had to be careful with what I asked for, like the universe was rationing things out.

    But the universe is not on a tight budget. It’s not running out of jobs, partners, ideas, opportunities, or good bosses. There’s no scarcity at the source — the scarcity exists only in our thinking.

    How to avoid it: Ask for the full picture. Don’t water down your list because you’re scared of being “too much.” Write the boss, the team, the salary, the schedule, the apartment, the city, the laptop (and yes — specify if you want it new), the morning routine. All of it. You’re not being greedy. You’re being clear.

    I manifested the job I wanted

    Mistake #9: Quitting Right Before It Lands

    So many people manifest beautifully for weeks, then give up two days before the thing would have arrived. The wait period is the hardest part because it asks for trust without proof.

    But trust without proof is exactly the work.

    How to avoid it: When you feel the urge to quit, write a single line in your journal: “I trust this is on the way, even if I can’t see it yet.” Sometimes that’s the whole practice.

    What I Do Differently Now

    When I sit down with my manifestation journal these days, I no longer just write a wish list. I write a life. I describe the kind of work I want to do, the kind of people I want around me, the kind of leader I want to follow (lesson learned), the kind of mornings I want to have, and the kind of woman I want to be while having all of it.

    I leave nothing blank. Not because the universe is testing me, but because I now understand that clarity is the language manifestation speaks. If I want a MacBook, I write new. If I want a job, I write the boss. If I want a life, I write the whole life.

    The universe is always listening. It’s generous. It doesn’t ration. But it can only give you what you’ve actually asked for — so ask for the whole life, not just the headline.

    Join The Manifestation Week

    If today’s post hit something in you, I made something to take it further.

    The Manifestation Week is a free 7-day email series I created for women who are tired of manifesting on autopilot. Each morning, for seven days, you’ll get one email with a short meditation, honest journaling prompts, and examples of how to actually phrase what you want — because as you read today, the universe is generous, but it’s also literal. Every word matters.

    Day 1 lands in your inbox the moment you sign up.

    🌙

    Manifest with intention.
    One week. Seven emails.

    Get The Manifestation Week — a free 7-day email series with daily meditations, journaling prompts, and examples of how to phrase what you actually want. Because the universe is generous, but it’s also literal.

    One email a day for 7 days, then occasional letters from me. Unsubscribe anytime.

    You may also like to read…

    • How to Start a Blog From Scratch: An Honest Beginner’s Guide

      The Honest Version Nobody Posts on Pinterest If you’ve spent more than ten minutes Googling how to start a blog from scratch, you’ve probably noticed that every article reads like a checklist written by someone who is not, in fact, blogging. Pick a niche. Buy a domain. Install a theme. Publish. Make six figures by…

    • My corporate burnout recovery journey

      Personal growth · Self-improvement · Burnout recovery I spent four years in corporate life convincing myself that the anxiety I felt every Sunday night was normal. That the dread of walking into an office was just part of being an adult. That everyone felt this way — and that burnout recovery and personal growth were…

    • From the Office to Chaos: How I Organized My Scattered Mind (and My Days) When I Lost My Routine

      Leaving the structure of a corporate job can leave your mind feeling completely lost and scattered. Read my personal story of surviving my first month of unemployment and discover the simple, guilt-free 3-step reset system I created to organize my days and regain my focus.

    • 20 Screen-Free Things To Do When You Need To Reconnect With Yourself

      We live in a world where thinking has been quietly outsourced. Here are 20 simple, screen-free things you can do to reconnect with yourself — not in a perfect way, just in a real one.

  • I Hit 114k Pinterest Impressions in 6 Months — And Only 82 People Clicked. Here’s What That Taught Me About How to Monetize Pinterest.


    There’s a specific kind of disappointment that comes from watching your Pinterest analytics climb while your bank account stays exactly the same.

    I remember the morning I checked the numbers. Six months of pinning, of designing covers in Canva at midnight, of rewriting descriptions until the keywords felt right. And there they were:

    • Impressions: 114,190
    • Engagements: 5,810
    • Saves: 1,140
    • Outbound clicks: 82

    Read that last one again. Eighty-two clicks. Out of 114,000 people who saw my pins, eighty-two actually visited the place I was sending them.

    I screenshotted the dashboard. I felt proud of the impressions for about ten minutes. Then I looked at the click number again and finally understood what I had been doing wrong all along.

    If you’re reading this, you probably already know the feeling. Maybe your numbers are smaller, maybe bigger. The frustration is the same: you’re showing up, the impressions are real, the saves are climbing — and somehow none of it is turning into a single dollar. This post is the conversation I wish someone had with me back then — about how to monetize Pinterest the right way, and the one piece of the puzzle I was missing.

    The lie I believed about how to monetize Pinterest

    When I started, I thought Pinterest was the destination. Pin enough, optimize enough, go viral enough — and the income would follow.

    It doesn’t work that way. And nobody on the “Pinterest growth” side of the internet wants to say it out loud.

    Pinterest is a search engine that sends traffic somewhere else. That’s literally its job. When someone clicks your pin, Pinterest’s work is done. The question is: where are they landing? Because that is where money actually gets made.

    For months, my pins were landing the few people who clicked on a Beacons page. A pretty link-in-bio with three buttons. They’d arrive, glance at the options, and leave. No email captured. No product sold. No affiliate clicked. Pinterest had done its job. I just hadn’t built anywhere worth sending them to.

    What 82 outbound clicks actually told me

    Most people would look at those numbers and panic about the click rate. I did at first. A 0.07% click-through rate sounds catastrophic.

    But that wasn’t actually the problem. Or — it was, but not for the reason I thought.

    The low click rate wasn’t a Pinterest issue. It was a destination issue made visible at the pin level. When your pin links to a generic link-in-bio, two things happen: your pin design has nothing specific to promise (it’s just “click for my links”), and the people who do click immediately bounce because there’s no payoff. Pinterest’s algorithm notices the bounce and shows your pins to fewer people. The whole cycle reinforces itself.

    Now look at the other numbers in that screenshot:

    • 5,810 engagements — people interacting with my pins
    • 1,140 saves — people actively bookmarking them for later
    • 78,120 total audience — humans my work has reached

    Those numbers tell a completely different story. People are responding to my content. They like it enough to save it. The audience is real. What was missing wasn’t interest. It was a reason to leave Pinterest.

    And here’s the part I want you to sit with: if you have any meaningful traffic on Pinterest right now — even 5,000 monthly impressions — and you’re sending it to a link-in-bio, the same pattern is happening to you. You already have the hardest part. You have eyeballs, you have saves, you have engagement. What’s missing is the place they land.

    How to actually read your Pinterest numbers

    Before we go any further, let’s translate. Most creators stare at their Pinterest dashboard and only feel one of two emotions: pride at the big number, or panic at the small one. That’s not analysis. That’s mood.

    Here’s how to actually read what your account is telling you, metric by metric:

    Impressions — How many times your pins showed up on someone’s screen. This is a visibility metric, not a success metric. A high number means Pinterest is distributing your content. It tells you nothing about whether anyone cares. Treat it as a “is my account alive” signal.

    Engagements — Any interaction with your pin: a click, a save, a close-up. This is a quality signal. High engagements relative to impressions (roughly 3% or more) means your pin designs and topics are landing. If this is low, the problem is upstream — your covers or your hooks aren’t earning the tap.

    Saves — Someone bookmarked your pin to come back to. This is the most underrated metric on the platform. Saves tell Pinterest your content is worth distributing further, and they tell you exactly which topics your audience finds genuinely valuable. If a pin gets a lot of saves but few clicks, your topic is right but your destination isn’t compelling enough. That’s not a content problem. That’s a destination problem.

    Outbound clicks — The number of people who actually left Pinterest to visit your link. This is the only metric that matters for income. Everything else is leading indicators. If this number is low compared to your saves and engagements, you’re in the exact spot I was — building an audience that has nowhere to go.

    Total audience — Unique humans who saw your pins this month. This is your “reach.” It’s a vanity number on its own, but useful for spotting growth trends month over month.

    Engaged audience — Unique humans who actually interacted with a pin. This is your real audience size. If your total audience is 78k but only 4k of them engaged, your real audience is 4k. Plan accordingly.

    Now here’s the diagnostic. Open your Pinterest dashboard right now and ask:

    1. Are my saves higher than my outbound clicks? If yes, your content is working but your destination isn’t. (This is the most common pattern, and the one this post is about.)
    2. Are my engagements low compared to impressions? If yes, the problem is at the pin level — covers, titles, or topics aren’t earning the tap.
    3. Are my impressions falling month over month? If yes, the algorithm is deprioritizing you, often because clicks bounce back to Pinterest too fast (the destination problem reinforcing itself).

    For me, the diagnosis was #1. Saves were 14x higher than outbound clicks. The audience was telling me they liked the content. They just had nowhere worth going.

    If your numbers tell you the same story, the next sections are for you.

    Why a link-in-bio will never be enough

    I want to be specific about why Beacons (or Linktree, or any link-in-bio tool) is a dead end for monetization. It’s not that they’re bad — they’re great for what they are. They’re just the wrong tool for the job.

    A link-in-bio is a menu. Someone clicks, scans a list, picks one option (or none), and leaves. There’s no story being told, no problem being solved, no relationship being built.

    A blog post is a conversation. It hooks someone with a story, walks them through an idea, and at the right moment offers them something — a free download, a product, a recommendation. By the time you ask for the email or the sale, they already trust you.

    That difference — menu vs. conversation — is why one earns and the other doesn’t. It’s also why pins that link to blog posts get more clicks in the first place: the pin can promise something specific (a story, a guide, a checklist) instead of “tap here for my links.”

    What a blog actually does that nothing else can

    Once I built bysofimaruri.com, the entire equation flipped. Same Pinterest, same effort — but now every pin had a real destination, and every click could actually do work.

    Here’s what a blog does that a link-in-bio simply cannot:

    It captures emails. Every post can have a lead magnet — a free download, a checklist, a small toolkit. People who came for one thing leave with something useful and stay on your list forever.

    It hosts affiliate content. A “5 books that changed my mindset” post can earn for years. A link-in-bio cannot.

    It sells your own products. A blog post is a sales page in disguise. It builds trust first, then offers the next step.

    It compounds. Pinterest pins die in about 4 months. Blog posts ranked on Google bring traffic for years. Pinterest gets you the first wave; the blog keeps the wave coming.

    It belongs to you. Pinterest can change its algorithm tomorrow. Instagram can shadowban you. Your blog is the one piece of digital real estate nobody can take away.

    “But starting a blog sounds complicated”

    This is the part where most people quit before they begin. I almost did.

    You start googling “how to start a blog” and within five minutes you’re drowning in jargon — hosting, domains, SSL certificates, themes, plugins, SEO, CDN. Each tutorial assumes you already know what the last twelve mean. The whole thing feels like it requires either a tech degree or a budget you don’t have.

    It doesn’t. I’m not technical. I built my blog on a tight budget, with no developer, no agency, no clue what most of those acronyms meant when I started. The setup is actually small: a domain, a host, a free editor (no fancy page builders needed), and a handful of decisions about structure made in the right order.

    The reason most beginner blog tutorials fail isn’t that they leave things out — it’s that they leave them in. They teach you everything at once, when 80% of it doesn’t matter in your first six months. What you actually need is a clear sequence: do this, then this, then this, ignore everything else until later.

    Free download: the Blog SEO Checklist.

    The one-page list I run every post through before publishing. No fluff, no upsell — just what every beginner blog post needs to hit.

    The shortcut, if you want one

    Once I knew a blog was the answer, I had to figure out how to actually build one. That part took me longer than it should have. Most “how to start a blog” guides online are either ten-minute promo posts written to sell you hosting affiliate links, or 50-page manuals that drown you in technical detail before you’ve made your first decision.

    I ended up doing the research the slow way — comparing hosting options, figuring out which plugins actually matter, learning what 80% of beginners can safely ignore, and piecing together the right order to do things in so I didn’t waste money or time. By the end of it, I had a notebook full of the answers I wish someone had handed me on day one.

    Blog starter Ebook how to monetize Pinterest

    That notebook became an ebook. It’s called Blogging & Monetization, and it’s exactly what its name says: a clear, honest, beginner-friendly guide to creating your blog from scratch — the setup, the platform decisions, the things to skip, the order to do everything in. It’s not specific to Pinterest. It’s specific to the person who has decided they want a blog and just needs someone to walk them through it without selling them ten different upgrades along the way.

    If you’ve gotten this far in the post, that person is probably you. [Get the ebook here / join the waitlist here].

    And if you’re not ready for the full setup yet, that’s fine. Grab the free Blog SEO Checklist below — it’s the one-page list of the on-page SEO basics every new blog post should hit before you publish. Useful whether you already have a blog or you’re about to start one.

    Pinterest impressions don’t pay the bills. Saves don’t either. A blog does. The good news is, you can start building yours this week.


  • 20 Cute Date Ideas for Couples That Don’t Require Leaving the House

    If you’re looking for cute date ideas for couples that don’t require a reservation or a big budget, you’re in the right place. My boyfriend and I have been together for four years — we met on Tinder right after the pandemic, when the world had just reopened and everything still felt a little electric. And honestly? Some of our most memorable dates have happened without ever leaving home.

    Whether you’re newly dating or years in, there’s something here for you.
    Pssst: You can find all my favorite picks for at-home date nights curated in my Amazon storefront <3


    This post contains affiliate links, which means I may earn a small commission if you purchase through my links — at no extra cost to you. This helps keep By Sofi Maruri running and allows me to keep creating content I love. Thank you for your support!


    At-Home Cute Date Ideas for Couples That Are Actually Fun

    1. Make Homemade Pizza Together

    There’s something about making food from scratch that turns an ordinary evening into an event. We’ve done this multiple times and it never gets old — mostly because the result is delicious, and partly because rolling dough is genuinely chaotic and hilarious.

    Set up your ingredients like a little pizza bar, put on a playlist, and let everyone build their own. It’s low-pressure, hands-on, and the kind of date that ends with you both very full and very happy.


    2. Backyard or Living Room Picnic

    A picnic doesn’t require a park. Lay a blanket on the floor, put together a little spread of snacks and drinks, and suddenly your living room feels like somewhere else entirely.

    We’ve done this on the balcony with fairy lights and it remains one of my favorite low-effort, high-reward date nights. Add a charcuterie board and you’ve basically upgraded your whole evening.


    3. Movie Night With a Projector and Homemade Popcorn

    This one changed everything for us. We borrowed a small projector, pointed it at a blank wall, and turned our living room into a private cinema. Homemade popcorn — actual stovetop popcorn with butter and salt — made it feel genuinely special.

    Pick a theme for the night: a director’s filmography, a decade, a genre you’ve never tried. It gives the night a little structure and makes it feel curated rather than random.


    4. Draw Each Other

    This one sounds intimidating and ends up being one of the funniest dates you’ll ever have. Sit across from each other, set a timer for ten minutes, and draw your partner’s portrait. No phones, no cheating.

    The results are always terrible. That’s entirely the point.


    5. Bike Ride Around the Neighborhood

    Okay, this one technically involves leaving the house — but just barely. An evening bike ride around your area counts as a date when you make it intentional. Pack a small snack, pick a new route, and talk without screens.

    We’ve discovered entire streets we’d never walked down before, which is its own kind of adventure.


    6. Cook a Recipe From a Country You Want to Visit

    Pick a destination on your mutual bucket list and cook a traditional dish from there. It turns dinner into something with a story. We’ve done Thai, Italian from scratch, and a very ambitious attempt at Japanese ramen.

    The cooking itself becomes the date — the googling, the substitutions, the general chaos of an unfamiliar recipe.


    7. Board Game or Card Game Tournament

    Dig out a board game you haven’t played in years, or buy one you’ve been curious about. Make it a proper tournament with a small prize for the winner — bragging rights, choosing the next movie, picking the next date.

    Competitive dates are underrated. You learn a lot about someone when they’re losing at Catan.

    cute date ideas for couples — indoor picnic playing jenga

    8. Wine or Coffee Tasting at Home

    Buy three or four different bottles of wine — or bags of coffee, if that’s more your thing — and do a proper tasting. Look up what you’re supposed to taste, try to identify it, and rate each one.

    It feels fancy, it’s genuinely interesting, and it costs about the same as going out for drinks.

    Maybe you can try a Vanilla Cinnamon Latte like this one.


    9. Build Something Together

    A shelf, a piece of furniture, a small DIY project from a kit. Building something side by side is surprisingly bonding — and slightly stressful in a way that somehow brings you closer.

    We once spent two hours assembling a piece of furniture we’d bought together and felt genuinely accomplished afterward. 10/10 recommend.


    10. Stargazing From Your Roof or Backyard

    Download a stargazing app, bring blankets and something warm to drink, and spend an hour looking up. No agenda, no phones (except the app), just conversation and sky.

    It sounds simple because it is. That’s what makes it good.


    11. Write Letters to Your Future Selves

    This one is quiet and meaningful in a way that sneaks up on you. Each of you writes a letter to yourselves — or to each other — to be opened in one, three, or five years. Seal them, date them, and put them somewhere safe.

    It’s an exercise in reflection and intention, and it makes for a very different kind of conversation than your average evening.


    12. Have a Spa Night

    Face masks, a bath, candles, ambient music. Designate one evening entirely to slowing down and taking care of yourselves — together. Take turns giving each other a hand or shoulder massage.

    It’s the opposite of productive and that’s completely the point.


    13. Learn Something New Together on YouTube

    Pick a skill you’ve both always been curious about — calligraphy, origami, watercolor, basic music theory — and spend an evening following a beginner tutorial together.

    You’ll be bad at it. You’ll also be engaged, laughing, and doing something that doesn’t involve a screen passively.


    14. Create a Couples Bucket List

    Get a big piece of paper, two pens, and start writing — everything you want to do together, places you want to go, experiences you want to have. Near-future and far-future, realistic and wildly ambitious.

    Then hang it somewhere you’ll both see it. It’s a map of your shared life, and making it together is its own kind of date.


    15. Bake Something You’ve Never Made Before

    Croissants, soufflé, homemade bread, elaborate layer cake. Pick something with a high degree of difficulty and commit to it fully. It will probably go wrong at least once. That’s what makes it memorable.

    And if you’re a competitive couple — turn it into a full Bake Off. Each of you picks a recipe, sets a timer, and works independently. Then you taste, judge, and crown a winner. Bonus points for dramatic presentation and questionable commentary in a fake British accent.


    cute date ideas for couples — cupcake baking

    16. Have a Music Night — Swap Playlists

    Each of you creates a playlist of songs that mean something to you — a soundtrack to your life, a mood, a memory. Then you take turns playing songs for each other and explaining why you chose them.

    This is one of the most genuinely intimate dates on this list, and it costs nothing.


    17. Do a Puzzle Together

    Long, meditative, and surprisingly satisfying. Put on an album you both love, open a bottle of wine, and work on a puzzle over the course of an evening.

    A 1,000-piece puzzle will take multiple sessions, which means multiple evenings of the same gentle, easy company.


    18. Have a Fancy Dinner at Home — With Actual Effort

    Dress up. Set the table properly. Use the good plates. Light candles. Cook a two-course meal and eat it slowly, without phones at the table.

    There’s something about putting in the effort at home that feels more intimate than going out. It’s a date you made for each other, not a restaurant someone else designed.


    19. Make a Hand Casting Together

    This one is equal parts romantic and ridiculous — and that’s exactly why it works. A hand casting kit lets you create a permanent mold of your hands intertwined, which sounds cheesy until you actually have it sitting on your shelf and realize it’s one of the most personal things in your home.

    The process itself is the date: mixing the alginate, holding completely still, trying not to laugh while your hands are submerged. It takes about an hour and leaves you with something you’ll keep for years.

    🔗 Couples hand kit on Amazon


    20. Create a Scrapbook of Your Relationship

    Print out photos, gather ticket stubs and mementos, and spend an evening building a physical record of your time together. Put on music, pour drinks, and let the night become an exercise in remembering.

    Four years in, this one hits differently. Every photo is a whole story.

    cute date ideas for couples — black scrapbook with pictures.

    Final Thoughts

    The best cute date ideas for couples aren’t about spending a lot of money or going somewhere impressive. They’re about choosing to be intentional with your time together — to put down the phones, to make something, to pay attention.

    Four years, countless dates, and the ones I remember most are the ones where we were simply present. I hope some of these ideas give you that same feeling.

    Save this post for later — and if you try any of these, I’d love to know which one became your favorite.

    These cute date ideas for couples pair perfectly with these posts:

  • The Chamomile Latte That Replaced My Evening Coffee (And Actually Helps Me Sleep)

    The Chamomile Latte That Replaced My Evening Coffee (And Actually Helps Me Sleep)

    A warm, caffeine-free ritual for anxious girls who still want their latte fix.


    This post contains affiliate links. If you buy something through one of them, I may earn a small commission at no extra cost to you. I only ever recommend products I genuinely use and love. Thank you for supporting By Sofi Maruri.


    I have been a latte girl for as long as I can remember. Morning latte. Mid-afternoon latte. Latte for dessert (Italians, please don’t come for me — yes, I drink milk with coffee after 11 a.m. and I will not be apologizing).

    But here’s the thing about being a 5’2″ human running on anxiety and a small body weight: I cannot drink caffeinated lattes all day without my nervous system filing a formal complaint. By 4 p.m., my hands are shaking, my chest feels tight, and any chance of falling asleep before midnight has officially left the building.

    So one evening, somewhere between needing a latte and needing to actually rest, I stumbled on this recipe — and I fell in love.

    It’s a chamomile latte. Hot milk, chamomile tea, a stick of cinnamon, and a splash of vanilla. I’ll be honest: the first time I read “chamomile + milk” together, I made a face. It sounded like something a grandmother would invent in a panic. But I tried it anyway, and reader, it works. It’s creamy, lightly sweet, smells like a hug, and it has genuinely become the moment in my evening where my body understands the day is ending.

    This is the recipe, the why behind each ingredient, and how it actually works on your body — because I think when you understand what you’re drinking, the ritual gets even better.


    Why a Chamomile Latte Is Worth the Detour

    Most “calming” drinks I had tried before this either tasted like wet leaves or required me to pretend I was enjoying them. This one is different. It’s the texture of a real latte — that frothy, milky comfort — but instead of caffeine winding you up, every ingredient is doing the opposite.

    It’s the kind of drink that gives your brain a small, clear signal: we’re done for today. And after years of trying to white-knuckle my way into sleep, I’ll take any signal I can get.


    The Recipe

    Makes 1 mug. Takes about 7 minutes.

    Ingredients

    • 1 cup whole milk (or oat milk if you’re plant-based — it froths beautifully)
    • 1 chamomile tea bag, or 1 tablespoon of loose-leaf chamomile
    • 1 small cinnamon stick (or ¼ teaspoon ground cinnamon)
    • ½ teaspoon vanilla extract, or a small piece of vanilla bean
    • 1 teaspoon honey or maple syrup, optional, to taste

    Method

    1. Warm the milk gently. Pour the milk into a small saucepan over low-medium heat. Add the cinnamon stick and the vanilla. You want the milk to get hot and steamy, but not to boil — bubbling milk turns bitter and you’ll lose that silky texture.
    2. Add the chamomile. Drop in the tea bag (or loose chamomile in a strainer). Let everything steep together for 4 to 5 minutes. The milk will turn the softest pale gold and start smelling like a spa.
    3. Strain and sweeten. Remove the tea bag and cinnamon stick. If you want sweetness, stir in honey or maple syrup now, while it’s still warm.
    4. Froth it. This is the part that makes it feel like a real latte and not just hot milk. Use a handheld milk frother for about 20 seconds, or pour the milk into a sealed jar and shake hard for 30 seconds, then microwave for 10 more.
    5. Pour into your favorite mug. Top with a tiny dusting of cinnamon. Sit somewhere quiet. Drink it slowly.

    What Each Ingredient Is Actually Doing

    This is the part I find genuinely fascinating. None of these ingredients are doing magic. They’re just gently nudging your nervous system, your digestion, and your blood sugar in the direction of calm.

    Chamomile

    Chamomile is the heart of this drink. It contains a flavonoid called apigenin, which binds to the same receptors in your brain (GABA receptors) that anti-anxiety medications target — but in a much, much softer way. The result is a mild relaxant effect: your shoulders drop, your jaw unclenches, your thoughts slow down a notch.

    Chamomile also has a long history of use for soothing the digestive system, easing menstrual cramps, and reducing mild inflammation. It’s the kind of ingredient that doesn’t knock you out, but quietly tells your body it’s safe to relax.

    Warm Milk

    The “warm milk before bed” thing isn’t just folklore. Milk contains tryptophan, an amino acid your body uses to produce serotonin and melatonin — the hormones that govern mood and sleep. The amount in one cup isn’t huge, but combined with the warmth (which lowers your core temperature slightly afterward, exactly what your body needs to fall asleep), it’s a real physiological cue.

    There’s also something undeniably regressive about hot milk in the best way. It taps into something old and small in us. I think that matters, even if it’s not chemistry.

    Cinnamon

    Cinnamon does two quiet things here. First, it helps regulate blood sugar — which means fewer of those late-night crashes that wake you up at 3 a.m. with your heart racing. Second, it’s anti-inflammatory and warming, which makes the drink feel cozier without adding anything heavy.

    It also smells like home, and I refuse to underestimate that.

    Vanilla

    Vanilla isn’t just for flavor. The scent of real vanilla has been shown in small studies to lower heart rate and reduce the body’s startle response. It’s one of those smells that the nervous system reads as safe. Even a quarter teaspoon adds a softness to the drink that I genuinely think you can feel in your shoulders.


    When to Drink It

    I make mine about an hour before bed, after dinner has settled and I’m winding down. That window matters — you don’t want a full belly of warm milk right as you lie down (uncomfortable), and you don’t want it so early that the calm wears off before you actually sleep.

    But it doesn’t have to be a bedtime drink. I also turn to it on:

    • Sunday afternoons, when I’m trying to slow down before the week starts
    • Days when my anxiety is louder than usual and a regular coffee would push me over the edge
    • Cold, gray afternoons that just need something warm in your hands

    It is, in every sense, a pause in liquid form.


    Make It a Ritual, Not Just a Drink

    The thing I’ve learned about lifestyle changes is that the small ones stick when you make them feel like something. So I do this:

    I put my phone face-down. I light a candle (cheap one, doesn’t matter). I drink the latte from a real mug, not a travel cup. Sometimes I read for ten minutes. Sometimes I just sit and stare at the wall like a Victorian woman, and that counts too.

    It’s seven minutes of preparation and maybe fifteen minutes of drinking it. That’s twenty-two minutes a day where I am explicitly not producing anything, and somehow those twenty-two minutes have done more for my sleep than any app, supplement, or productivity hack.


    A Small, Honest Note

    I am not a doctor and this is not medical advice. Chamomile is generally very well tolerated, but if you’re pregnant, on blood thinners, or allergic to plants in the daisy family (ragweed, marigolds), please look into it before adding it to your routine. And if your anxiety is the kind that needs more than a warm drink, please talk to someone — there is no latte in the world that replaces actual support.

    But for the bad-but-not-terrible nights, the wired evenings, the can’t-quite-shut-it-off afternoons? This drink, this small ritual, has been one of the gentlest, most consistent things I’ve added to my life this year.

    Try it once. Make it slowly. Pay attention.

    You might love it the way I do.


    If you make this, I would love to see it. Tag me on Pinterest or send me a photo — I save every single one.

    You may also enjoy…

  • Wellness Gifts: The Pretty and the Practical

    Wellness Gifts: The Pretty and the Practical

    This post contains affiliate links, which means I may earn a small commission if you purchase through them — at no extra cost to you. I only recommend products I’ve personally used and genuinely love.

    In a hurry? You can shop my full wellness picks (and everything else I’ve curated) directly on my Amazon Storefront — all the products from this guide are saved there, ready to browse without scrolling through the post.


    Let me say something controversial about wellness gift guide Amazon lists: most of them are styled to look beautiful on a shelf, not lived with. The candle gets lit twice. The crystal water bottle collects dust. The aesthetic eye mask sits in a drawer because it isn’t actually that comfortable.

    This guide is different. Every product on this list is something I or someone I trust uses regularly — not because it looks good in a flat lay, but because it does the job. Some of them are gorgeous. A few of them are aggressively un-aesthetic. The cracked heel balm comes in a yellow plastic stick that looks like it was designed in 1997. It also works better than anything else I’ve tried, so it’s here.

    If you’re shopping for the wellness girl in your life — or for yourself, no judgment — these are the gifts she’ll actually reach for.

    For the Slow Morning: Hatch Restore Sunrise Alarm Clock

    If she keeps her phone on the nightstand, this is the gift that breaks the habit. The Hatch wakes you up with a gradual sunrise simulation and soft sounds instead of a jarring alarm, and the difference in how you start the day is immediate.

    It also doubles as a sound machine and reading light, so it earns its spot on the bedside table around the clock.

    Why it makes a good gift: It’s the kind of thing people want but rarely buy for themselves.

    For Glass Skin: Embryolisse Lait-Crème Concentré

    A French pharmacy classic that has been used backstage at fashion shows for decades. It works as a moisturizer, a primer, a makeup remover, and an overnight mask — all in one tube.

    The texture is rich without being greasy, and skin looks plump and dewy after a single use. If she’s into the “glass skin” look but doesn’t want a ten-step routine, this is the shortcut.

    Why it makes a good gift: Affordable luxury that genuinely lives up to the hype.

    For the Hands That Do Everything: L’Occitane Almond Hand Cream

    There are a hundred hand creams on the market. This one is non-negotiable because of how it absorbs — fast enough that you can put it on before typing or scrolling, but moisturizing enough to actually do something.

    The almond scent is soft and slightly sweet without being perfumey. Keep one in the bag, one on the desk, one on the nightstand.

    Why it makes a good gift: Small, beautiful packaging makes it ideal for stocking stuffers or add-on gifts.

    For Hydration That Feels Intentional: A Crystal Carafe for the Nightstand

    Drinking enough water is one of those wellness basics that’s easier when the vessel feels nice. A heavy crystal carafe with a matching glass on top turns “drink more water” into a small ritual instead of a chore.

    It also looks lovely on a nightstand or a console — the kind of object that makes a room feel more grown-up.

    Why it makes a good gift: Beautiful, useful, and unexpected.

    For Travel and Daily Storage: A Structured Skincare Bag

    Anyone serious about a skincare routine knows the pain of digging through a floppy makeup bag for a single serum. A structured bag with internal compartments and a brush holder solves the problem completely.

    Look for one with a wipe-clean lining — products leak, and a soft fabric interior is a one-trip-and-done situation.

    Why it makes a good gift: Practical, but the kind of practical that feels like a treat.

    For the Worst Sleep of Her Life Becoming the Best: This Works Deep Sleep Pillow Spray

    A light mist of lavender, vetiver, and chamomile on the pillow before bed. The science on aromatherapy and sleep is mixed, but the ritual itself is what makes this work — spraying it signals to your brain that it’s time to wind down.

    I’ve recommended this to friends going through stressful periods, and the feedback is consistent: they fall asleep faster and feel more rested.

    Why it makes a good gift: A small, thoughtful luxury that supports better sleep without supplements or screens.

    For Sore Muscles and Restless Legs: Alo Magnesium Reset Spray

    Magnesium is having a moment in the wellness world for good reason — it helps with muscle recovery, tension, and sleep. The spray format is the easiest way to use it consistently. Mist it on legs, shoulders, or wherever feels tight before bed.

    The Alo formula is clean and doesn’t leave a sticky residue, which is the issue with most magnesium oils.

    Why it makes a good gift: It feels indulgent, but it solves a real problem.

    For Cracked Heels: Dr. Scholl’s Severe Cracked Heel Repair Balm

    Here’s the un-aesthetic hero of the list. The packaging is bright yellow plastic. There’s nothing minimalist or design-forward about it. And it is hands-down the most effective heel balm I have ever used.

    Apply it before bed, put on socks, and within a few nights cracked heels are visibly smoother. After a week of consistent use, the difference is dramatic. I’ve tried fancy versions in gorgeous tubes that cost three times as much and don’t come close.

    This is the test of a good wellness gift guide: are you willing to recommend the ugly product because it works? Yes. Always.

    Why it makes a good gift: Pair it with a pretty pair of cozy socks and you have a thoughtful, genuinely useful gift.

    For Body and Hair Care: Organic Raw Shea Butter

    A jar of unrefined shea butter is one of the most versatile things you can keep in a bathroom. Use it as a body moisturizer for very dry skin, a hair mask on the ends, a cuticle treatment, or layered over body oil for an intensive overnight repair.

    The texture is dense and a little waxy at first, but it melts on contact with skin. One jar lasts an embarrassingly long time.

    Why it makes a good gift: A multipurpose product that replaces three or four others in the routine.

    For Night Stretches and Slow Movement: A Quality Yoga Mat

    Not for hot yoga sweat sessions — for the ten minutes of stretching before bed that make a difference in how the body feels the next morning. A good mat with cushion and grip makes you actually want to roll it out, instead of stretching on the cold floor and giving up after two minutes.

    Look for natural rubber or cork — better grip, less off-gassing, more durable than the cheap PVC versions.

    Why it makes a good gift: Encourages a habit rather than just decorating a room.

    For Tired Eyes: A Caffeine and Peptide Eye Cream

    The under-eye area is the first place stress, late nights, and screens show up. A targeted eye cream with caffeine to depuff and peptides to firm makes a visible difference, especially when stored in the fridge for an extra cooling effect.

    The morning application becomes one of those small rituals that feel like genuine self-care — not because the cream is magic, but because the act of pausing for it is.

    Why it makes a good gift: Specific, useful, and easy to wrap.

    A Few Notes on Gifting Wellness

    Wellness gifts can go wrong when they imply the recipient needs fixing. The trick is to choose things that feel like permission to slow down, not pressure to optimize.

    Pair items into themed bundles — a “slow morning” set with the alarm clock and hand cream, a “rest era” set with the pillow spray and magnesium mist — and the gift starts to feel like a curated experience rather than a stack of products.

    And don’t be afraid of the un-aesthetic hero. The yellow heel balm goes in the bag. Real wellness includes the parts of the body and the routine that don’t photograph well, and a gift guide that ignores them isn’t being honest.

    Check the Mother’s Day Gifts on Amazon: 30 Ideas She’ll Actually Love (2026)

    • Coffee Lover Gift Guide: 16 Things I’d Actually Want to Receive
    • Mother’s Day Gifts on Amazon: 30 Ideas She’ll Actually Love (2026)

  • Bobbi Brown Cream Shadow Stick: My Honest Review After Months of Daily Wear

    Bobbi Brown Cream Shadow Stick: My Honest Review After Months of Daily Wear

    I’m not someone who falls in love with makeup products easily. I’ve tried plenty of cream eyeshadows that promised the world and creased before lunch, glittery formulas that scattered fallout all over my cheeks, and “easy to apply” sticks that demanded a brush, a primer, and a small prayer. So when I tell you that the Bobbi Brown Long-Wear Cream Shadow Stick in Golden Bronze has become a non-negotiable in my routine, I mean it.

    This is the kind of product that changed what I expect from eye makeup on a regular weekday. Here’s why.

    Why Golden Bronze Is the Shade I Reach For

    Golden Bronze is exactly what the name suggests, but the execution is what makes it special. It’s a warm, sun-kissed bronze with a real metallic shimmer — not chunky glitter, not a flat shimmer wash. It catches the light like skin does on a good day in summer.

    The shade flatters a wide range of skin tones, but it especially shines on warm undertones. If you’ve ever looked at a bronze shadow in the pan and worried it would read orange or muddy on your lids, this one doesn’t do that. It leans more golden than red, which keeps it looking lit-from-within rather than overdone.

    The Five-Second Application That Sold Me

    Let me describe my actual morning routine: I twist up the stick, swipe it across my mobile lid, blend the edges with my finger, and I’m done. No brush. No primer. No fallout to clean off my cheekbones.

    This is the part I cannot overstate. The texture is creamy enough to glide on without tugging at the eyelid, but it doesn’t drag pigment around the way some sticks do. You get a clean line of color exactly where you place it.

    For a more pulled-together look, I tap a second layer onto the center of the lid for a spotlight effect. That’s it. That’s the whole technique.

    Buildable Intensity Without the Mess

    One of the things I love most is that this shadow respects how much effort you actually want to put in. A single swipe gives you a soft, wearable shimmer — perfect for working from home, running errands, or those days when you want to look polished without looking done.

    Build it up with a second or third layer and suddenly you have a smoky, dimensional eye look that holds its own at dinner. I’ve worn this to weddings, work meetings, and lazy Sunday brunches, and it adapts to all of them.

    What it doesn’t do is get patchy or uneven as you build. That’s rare in cream formulas, and it’s the reason I keep recommending this stick to friends who tell me they “can’t do eyeshadow.”

    The All-Day Wear Test

    I have oily lids. I live in a climate where afternoons get warm. I rub my eyes more than I should admit. By any reasonable standard, I am the worst-case scenario for cream eyeshadow.

    This shadow stick lasts. Not “lasts until lunch” — actually lasts. I’ve checked the mirror at the end of long days expecting to see creasing, fading, or migration into the crease, and the color is essentially where I put it that morning. There’s a slight softening of the edges over time, but if anything that makes the look more lived-in and flattering, not worse.

    For longevity that serious, I expected to need a dedicated eye makeup remover. A regular cleansing oil or micellar water takes it off without scrubbing.

    The real test came at weddings. I’ve worn this through six-plus-hour celebrations — ceremony, dinner, and hours of dancing on the floor under hot lights. Between the heat, the sweat, and zero touch-ups in my bag, I fully expected to find smudged-out lids by the time the cake came around. Instead, the color stayed exactly where I put it. No migration, no creasing, no fading. If it can survive a wedding reception in motion, it can survive anything you throw at it.

    Who Will Love This Shadow Stick

    If you’re a beginner who finds eyeshadow palettes intimidating, this is the easiest entry point I’ve ever found. There’s no blending technique to master and no risk of muddy color.

    If you’re a busy person who travels often or gets ready in transit, the stick format is perfect. One product, no brushes, no extra steps.

    If you love a warm, golden-hour eye look, Golden Bronze will probably become a staple. It’s the makeup equivalent of soft afternoon light.

    Also check out my post $312 vs. $79: The Best Makeup Dupes That Actually Work

    A Few Honest Caveats

    To keep this review balanced: the price point sits in the higher mid-range of department store makeup. It’s an investment compared to a drugstore stick, but I’ve used mine almost daily for months and there’s still plenty of product left, so the cost-per-wear math works out in its favor.

    The shimmer level might be too much if you prefer a completely matte eye. This is not a matte product, and trying to make it one will only frustrate you. Bobbi Brown does offer the formula in matte and satin finishes, so the line itself has options.

    Final Verdict

    The Bobbi Brown Long-Wear Cream Shadow Stick in Golden Bronze is the rare beauty product that lives up to its claims and earns a permanent spot in my routine. It’s beautiful, foolproof, long-wearing, and flattering — exactly what I want from my favorite eyeshadow.

    If you’ve been looking for an everyday eye look that takes less than a minute and still looks intentional, this is the one I’d point you to first.

  • The Best Vanilla Cinnamon Latte You’ll Make at Home

    The Best Vanilla Cinnamon Latte You’ll Make at Home

    There is a specific kind of silence that only exists at 7:15 AM, right before the world decides to start demanding things from you. My nightstand is usually a chaotic landscape of my Kindle, three different lip balms, and a charger cable that works only at a specific angle. It is the habitat of a 28-year-old teenager who is still figuring out how to “adult” without losing the wonder of it all. In that quiet window, before the emails start pinging and the “to-do” list begins to itch, I have this ritual. It isn’t about productivity or “fueling up” for a grind I didn’t sign up for; it is about the gentle act of being kind to myself.

    For a long time, I thought a truly good latte was something I had to outsource. I’d put on a coat, walk to the corner cafe, and pay someone else to create that perfect cloud of microfoam and spice. But there is something deeply grounding about making it yourself. Holding a warm mason jar while the steam hits your face is a form of meditation that no app can replicate. This vanilla cinnamon latte at home has become my signature morning anchor. It tastes like a hug in a glass, a sweet and spicy reminder that even if the rest of the day goes sideways, the first fifteen minutes were exactly what I needed them to be.

    Why this homemade vanilla latte is the ultimate mood shifter

    Most coffee recipes you find online are either too clinical or far too complicated for someone who hasn’t had their caffeine yet. This recipe works because it prioritizes the quality of the ingredients over the complexity of the technique. We aren’t trying to be world-class baristas here; we are just trying to make something that makes our souls feel a little more settled. By using real honey instead of a processed syrup, you get a depth of sweetness that feels artisanal rather than artificial. It doesn’t just sit on top of the coffee; it weaves through it.

    The inclusion of cinnamon isn’t just for the aesthetic of a “cozy morning coffee.” When you whisk cinnamon directly into the espresso or the milk, it releases oils that change the entire profile of the bean. It cuts through the bitterness and adds a woody, earthy warmth that makes the vanilla pop. This isn’t a drink that leaves you with a sugar crash twenty minutes later. It’s balanced, intentional, and remarkably easy to replicate even when you’re still half-asleep and wondering where you left your slippers. It’s a small luxury that costs pennies but feels like a ten-dollar treat.


    What you’ll need for your cinnamon latte recipe

    Gathering your ingredients is the first step in the ritual. Take a second to smell the cinnamon and the vanilla before you start. It’s part of the magic.

    • 1-2 shots of espresso: If you don’t have an espresso machine, a very strong moka pot brew or even a concentrated French press coffee works beautifully.
    • ¾ cup of milk: Whole milk creates the best foam, but oat milk is a close second for that creamy, nutty finish.
    • 1 tbs of raw honey: This provides a natural, floral sweetness that balances the spice.
    • ½ tbs of real vanilla extract: Please, skip the “vanilla flavoring.” We want the real deal here.
    • ½ tbs of ground Ceylon cinnamon: It’s sweeter and more delicate than the standard supermarket variety.
    vanilla cinnamon latte ingredients flat lay
    Full disclosure: The super aesthetic ingredient flat lay below? Yeah, that’s courtesy of AI. Because let’s be honest, my real kitchen counters look less like a Pinterest board and more like a ’28-year-old teenager’ explosion. We keeping it real here!

    Kitchen essentials you’ll want

    You don’t need a kitchen full of high-tech gadgets to make a masterpiece. These are the few tools I swear by to keep my coffee station looking cute and functioning perfectly.

    Handheld Milk Frother

    This is the secret to that cloud-like texture without spending hundreds on a steam wand. It’s small enough to tuck into a drawer and powerful enough to make your milk look like a painting.

    🇺🇸 Get it on Amazon · 🇲🇽🇨🇱🇦🇷 En Mercado Libre

    Nespresso Machine

    The ultimate shortcut to a perfect, consistent espresso shot. It’s quick, mess-free, and ensures your latte base is exactly the same every single morning. Plus, it looks sleek on any countertop.

    🇺🇸 Get it on Amazon · 🇲🇽🇨🇱🇦🇷 En Mercado Libre

    Real Vanilla Extract

    Invest in the good stuff. You only use a little bit at a time, and the difference in flavor is monumental. It smells like a dream and lasts forever.

    🇺🇸 Get it on Amazon · 🇲🇽🇨🇱🇦🇷 En Mercado Libre

    Ceylon Cinnamon

    Unlike regular cinnamon, Ceylon is “true” cinnamon. It’s softer on the palate and doesn’t have that harsh bite, making it perfect for lattes.

    🇺🇸 Get it on Amazon · 🇲🇽🇨🇱🇦🇷 En Mercado Libre

    Glass Mason Jars

    There is something about seeing the layers of coffee and foam through the glass that makes the experience feel more elevated. Plus, they’re easy to clean.

    🇺🇸 Get it on Amazon · 🇲🇽🇨🇱🇦🇷 En Mercado Libre


    How to make the best vanilla cinnamon latte at home

    Step 1: Prep your base

    Start by brewing your espresso or strong coffee. While the coffee is still piping hot, add your tablespoon of honey and the half tablespoon of cinnamon directly into the mug or jar. Use a small spoon to whisk them together until the honey has completely dissolved and the cinnamon is well incorporated. This ensures you don’t end up with a clump of spice at the bottom of your drink.

    Step 2: Add the vanilla

    Stir in your vanilla extract. Adding it to the hot coffee base helps to release the aroma. At this point, your kitchen should start smelling like a high-end bakery.

    Step 3: Heat the milk

    Warm your milk on the stove or in the microwave. You want it hot to the touch but not boiling (around 150°F if you’re being precise, but “steamy” is a good visual cue). If you boil it, the proteins break down and it won’t foam as well.

    Step 4: The frothing ritual

    Take your handheld frother and tilt the milk container slightly. Insert the frother just below the surface to create large bubbles, then move it deeper to create that creamy, velvety microfoam. Do this for about 20-30 seconds until the milk has almost doubled in volume.

    Step 5: The pour

    Slowly pour the frothed milk over your spiced coffee base. If you’re feeling fancy, use a spoon to hold back the foam so the liquid milk goes in first, then dollop the foam on top at the very end.

    Step 6: The finishing touch

    Dust a tiny bit of extra cinnamon on top. Find a spot with good natural light, put your phone on “Do Not Disturb,” and take that first sip.


    Pro tips from a 28-year-old teenager

    After making approximately five hundred of these, I’ve learned a few things about how to keep the process stress-free and the flavor consistent.

    • Bloom your cinnamon: If you find the cinnamon stays too grainy, try mixing it with a tiny splash of hot water or the honey first to create a paste before adding the coffee. It “blooms” the spice and smooths the texture.
    • Temperature matters: If you’re using a non-dairy milk, don’t overheat it. Oat and almond milk tend to “separate” or taste slightly burnt if they get too hot. Keep it gentle.
    • The Jar Trick: If you don’t have a frother yet, you can put your warm milk in a mason jar, screw the lid on tight, and shake it vigorously for 30 seconds. It’s a great arm workout and surprisingly effective.
    • Quality of Water: It sounds nerdy, but if your tap water tastes like chlorine, your coffee will too. Use filtered water for your brew to let the vanilla and cinnamon notes really shine.

    Variations to try

    While the hot version is my go-to for slow mornings, life happens, and sometimes you need a different vibe.

    • The Iced Version: Follow the steps to make the coffee base with honey, cinnamon, and vanilla. Let it cool slightly, then pour over a glass full of ice. Top with cold milk and a splash of cream.
    • The Oat Milk Swap: For an extra-creamy, almost toasted-oat flavor, use a “Barista Edition” oat milk. It pairs beautifully with the woodiness of the Ceylon cinnamon.
    • Decaf for the Soul: I love having one of these at 8:00 PM while reading in bed. Just swap the espresso for a high-quality decaf bean. It’s the ultimate sleep ritual.

    Frequently Asked Questions

    Why does my cinnamon always clump at the top?

    Cinnamon is hydrophobic, meaning it doesn’t naturally want to mix with liquid. The trick is to mix it with the honey or a tiny bit of hot espresso first to create a “slurry” before adding the rest of the milk.

    Can I use maple syrup instead of honey?

    Absolutely. Maple syrup gives it a more autumnal, “pancake-esque” flavor which is also delicious. However, honey provides a thicker mouthfeel that I personally prefer for this specific recipe.

    What if I don’t have an espresso maker?

    No problem at all. Just make a very small, concentrated amount of regular coffee. Use double the grounds you usually would for the same amount of water. It won’t be “true” espresso, but with the milk and spices, you’ll hardly notice the difference.


    Making your own coffee is a small act of rebellion against a world that wants us to hurry up. It is a way to say, “I am worth the five minutes it takes to froth this milk.” Whether you’re drinking this in your pajamas or while getting ready for a big meeting, I hope it brings you a little bit of peace.

    If this recipe made your morning better, wait until you see my guide with 15 cozy recipes for slow mornings. Drop your email below and I’ll send it free.

    Subscribe and get my 15 cozy morning recipes guide free!

    Please wait…

    Thank you for sign up!

    Stay curious and stay cozy. ☕

    Besos,

    Sofi

    Next up on the blog: Why I’m reclaiming the word ‘hobby’ and why you should too.


    Affiliate Disclosure: This post contains affiliate links. If you purchase through these links, I may earn a small commission at no extra cost to you. I only recommend products I genuinely use and love in my own kitchen.

  • How to Start a Blog From Scratch: An Honest Beginner’s Guide

    How to Start a Blog From Scratch: An Honest Beginner’s Guide


    The Honest Version Nobody Posts on Pinterest

    If you’ve spent more than ten minutes Googling how to start a blog from scratch, you’ve probably noticed that every article reads like a checklist written by someone who is not, in fact, blogging. Pick a niche. Buy a domain. Install a theme. Publish. Make six figures by Tuesday.

    I’m writing this from the other side of those tutorials — the side where you actually do the thing, get stuck on something nobody warned you about, and quietly close your laptop at 1 a.m. wondering if everyone else found this easier than you did.

    This is the post I wish someone had written before I started By Sofi Maruri. No affiliate-stuffed listicle, no fake “I made $10K my first month” screenshots. Just the real timeline of building a blog from zero, in your late twenties, with a full life happening around it.

    I didn’t have a mentor, a course, or a friend who’d done this before me. I had open browser tabs, contradictory advice, and a lot of wasted weekends. That detail matters for the rest of this post, so hold onto it.

    Why I started a blog before 30

    I didn’t start blogging because I had a content strategy. I started because I needed somewhere to put the version of myself that didn’t fit anywhere else.

    I’d left a corporate path that looked good on paper, started building a slower, more intentional life in Chile, and realized I had a lot of things to say about travel, food, personal growth, and the strange in-between of figuring out adulthood without a manual. The blog became the container for all of it.

    If you’re considering starting a blog from scratch, the first honest thing I can tell you is this: a niche you can sustain matters more than a niche that ranks. If you don’t actually want to write about it on a Tuesday night when nobody is reading, no SEO strategy will save you.

    The expectations vs. the reality

    Here’s what I thought starting a blog would look like:

    1. Buy a domain (cute).
    2. Pick a beautiful theme (fun).
    3. Write posts (I love writing).
    4. Watch traffic come in (sure, why not).

    Here’s what it actually looked like:

    1. Spend a week comparing hosting plans, second-guessing every choice.
    2. Buy the domain. Feel briefly powerful.
    3. Open WordPress for the first time and immediately want to close it.
    4. Try to make a homepage. Fail. Try a different theme. Fail differently.
    5. Reset everything. Start over.
    6. Realize “writing posts” is maybe 20% of having a blog.
    7. Cry a little. Keep going anyway.

    If your version of starting a blog from scratch involves a meltdown around step four — congratulations, you’re doing it normally.

    The disaster that actually taught me something

    A few weeks in, I made the classic beginner mistake: I tried to make my blog look exactly like a Pinterest screenshot. I downloaded a complicated theme, installed plugins I didn’t understand, and built a homepage that looked beautiful for about six hours before something broke and I couldn’t undo it.

    I had to do a full reset. Theme gone. Layout gone. The fake productivity of “look how much I’ve built” — gone.

    That reset is the most useful thing that’s happened to my blog so far, and here’s why: it forced me to start with the boring stuff first. Permalinks. Category slugs. A clean static homepage. A theme (I switched to Kadence — Astra is also great) that didn’t require a paid version to look like a real website. An About page written like a human wrote it.

    The lesson: when you start a blog, build the skeleton before the skin. Everything cute you want to do later — sticky menus, fancy fonts, animated buttons — will be easier on top of a clean structure than retrofitted onto a mess.

    What I’d do differently to start a blog from scratch

    If you’re at the very beginning and want to start a blog from scratch, here’s the order I’d actually recommend, based on what saved me time vs. what I had to redo:

    1. Pick a long-game domain, not a clever one. Your name, or a phrase that isn’t tied to your current life stage. I love that mine includes my name — it grows with me.

    2. Choose hosting based on price and ease, not on the affiliate review with the most stars. I use Hostinger Premium (around USD 5/month) and it’s been more than enough to start. You don’t need enterprise hosting in month one.

    3. Use a free, lightweight theme from day one. Kadence and Astra are both excellent. Don’t pay for a theme until you know exactly what features you need. You probably won’t need them.

    4. Set up your structure before you write anything. Permalinks, categories, tags, your main pages (Home, About, Contact, a basic Newsletter page). This takes one focused afternoon and saves you weeks of cleanup later.

    5. Write the About page like you’re talking to one person. Not “Welcome to my blog, a space where I share…”. Write it like you’re explaining yourself to someone you actually like.

    6. Install only the plugins you need. For most beginners that’s: an SEO plugin (Yoast or RankMath), a caching plugin, and a backup plugin. That’s it. The plugin rabbit hole is real.

    7. Publish before it’s perfect. Your first post will be cringe in six months. So will mine. That’s how you know you’re growing.

    The tools that actually earned their place

    After months of trial, error, and reset buttons, this is the short list of what I actually use and recommend if you’re starting a blog from scratch:

    • WordPress.org as the platform (not .com — this matters)
    • Hostinger for hosting
    • Kadence as the theme
    • Gutenberg as the editor (no Elementor — the free version locks too much behind Pro)
    • Yoast for SEO
    • MailerLite for email — generous free plan, not ugly, not overwhelming
    • Pinterest for traffic — especially if you write in two languages like I do
    • Notion for everything behind the scenes: editorial calendar, post drafts, SEO tracking, ideas

    The Notion piece is the one nobody talks about enough. You will drown in ideas, drafts, half-finished outlines, and SEO research within your first month. Having a system for that isn’t optional — it’s the difference between blogging consistently and ghosting your own blog for six weeks.

    My first month, in real numbers

    Since I’m committed to honesty in this post, here’s exactly what one month of blogging looked like for me:

    • Total Amazon affiliate commissions: $0.37
    • Total clicks: 48
    • Total reward earnings: $0.00

    Yes, thirty-seven cents. I am not joking, and I am not embarrassed.

    Amazon affiliate dashboard showing first month earnings of $0.37 from 48 clicks

    I’m sharing the actual screenshot because the internet is full of “I made $5,000 my first month blogging” stories, and they’re either lying or selling you a course where the only person making $5,000 is them. The real first month of a blog, for almost everyone, looks like single-digit dollars and a lot of refreshing.

    Here’s why I’m proud of $0.37 anyway:

    • It’s $0.37 I didn’t have last month
    • Those 48 clicks are 48 real human beings who landed on my blog and trusted me enough to click through
    • Every single one of those clicks came from Pinterest, not Google — which means SEO traffic is still entirely ahead of me
    • It’s proof of concept that the system works, just at a tiny scale

    If you’re starting a blog and your first month earns you a coffee, you didn’t fail. You did the thing. The numbers compound — but only if you keep showing up.

    The lesson I’d pass on: Pinterest is the fastest traffic channel for a brand-new blog. Google takes months to trust you. Pinterest will start sending you visitors in week one if you pin consistently. If you only have time for one off-blog channel in your first 90 days, make it Pinterest.

    The shortcut to start a blog from scratch

    Most of what I just shared took me months to figure out — partly because every tutorial assumes you already know what a permalink is, and partly because there’s no map for the in-between of “I want a blog” and “I have a blog that actually works.”

    I didn’t have any of this when I started… so I built the resources I wish someone had handed me — and the only honest reason they exist is to save you the weeks I lost.

    [The Beginner Blog Ebook] — the full step-by-step of starting a blog from scratch, written the way I’d explain it to a friend who asked me over coffee. Hosting, domain, theme, structure, first posts, common mistakes, and the unsexy technical stuff in plain language.

    [The Notion Templates for Bloggers] — the actual system I use to plan posts, track SEO keyphrases, manage my editorial calendar, and keep ideas from disappearing into my Notes app.

    If you’d rather DIY it from blog posts and YouTube tutorials, I respect that — that’s how I started too. But if you’re trying to start a blog from scratch without losing weeks to mistakes I already made, those are the shortcuts I genuinely wish someone had handed me.

    The thing nobody tells you about how to start a blog from scratch

    Starting a blog from scratch is less about technical skill and more about emotional stamina. The tutorials make it look like a weekend project. It’s not. It’s a slow build of small decisions, broken layouts, deleted drafts, and the quiet practice of showing up to a thing nobody is watching yet.

    But there’s something real on the other side of that. A piece of the internet that’s actually yours. A place to put what you think. A small business that grows on your own time, in your own voice, on your own domain.

    If you’re standing at the beginning of that, scrolling through tutorials and wondering if you can really do it: you can. You’ll mess up the way I messed up. You’ll reset something at some point. You’ll publish posts that feel embarrassing in retrospect.

    The trade is your time… Either way, you’ll end up with a blog. The only question is how many late nights you want to lose on the way there.

    You’ll also, eventually, be the person writing the honest version for someone else.


    Did this help? The full beginner ebook and the Notion templates I use are linked above — and if you want the next post (probably “10 free WordPress plugins I actually use”), the easiest way to not miss it is to join the email list at the bottom of this page.